
If you caught the webinar last week that Kevin Sullivan and I presented, you might have caught the “secret tip” I presented at the end of the show (you can catch the whole webinar recording here). In there, I promised to more fully document this tip, so I’m doing that to let everyone experience the fun! What is the tip? Well, as the title of this blog implies, Group Policy Preferences, which is not available in the local GP Editor, can indeed be used on the local GPO! It requires a bit of a hack, which I’ll describe here, but in fact, GP Preferences does support running in the local GPO. What does this mean for you? It means that all the cool features you get in GP Preferences, like printer and drive mapping, registry hacks, Scheduled Tasks, power and device management, local users and groups, and IE configuration are available to machines that are not domain-joined, or have yet to be domain joined. This is pretty cool, and while the process is not super straight-forward, I think you’ll find it easy enough to leverage once you get the hang of it.
Local GPO Primer
The first thing to know about is the structure of the local GPO. The local GPO, by definition, does not exist in AD like “regular” GPOs, but rather, exists, well, locally, within a given Windows machine’s local file system. Specifically, the local GPO, if defined, can be found under c:\windows\system32\grouppolicy. Since Windows Vista, Microsoft added the ability to have multiple local GPOs. Strictly speaking, there is one local GPO for the computer itself, and multiple local GPOs for users of various kinds. The default computer local GPO settings are defined within c:\windows\system32\grouppolicy\machine. The default user local GPO settings are defined within c:\windows\system32\grouppolicy\user and apply to any users that log into the computer–domain accounts or otherwise. In addition, you can define 3 different types of other local user GPO settings, including:
- For all members of the local Administrators group who log into the machine
- For all users who are not members of the local Administrators group who log into the machine
- For specific local (i.e. non-domain user accounts) that log into the machine.
These 3 user-specific types are defined under c:\windows\system32\grouppolicyusers, where SID-named folders are created for each type. I won’t spend a lot more time getting into the local GPO, other than to define where and how it exists. The key to this tip is that you can apply GP Preferences settings to any of the local GPO types named here–computer or user. How? Let’s get into that
Applying GP Preferences to the Local GPO
There’s a set of steps that you’ll need to follow to pull this off. It’s not terribly hard but it does require a bit of work. I’m hoping to create a little PowerShell utility to make this easier but in the meantime, here are the general steps you’ll need to follow to get GP Preferences into the Local GPO:
- Create a domain-based GPO containing the GP Preferences settings you want to apply in the local GPO
- Copy the SYSVOL portion of the GP Preferences settings created in step 1 above, to the local GPO file system on the machine(s) you want to apply it to
- Edit the gpt.ini file in the local GPO under c:\windows\system32\grouppolicy to tell the local GPO about the GP Preferences settings you just copied there
- GPupdate yourself into GP Preferences local GPO bliss!
These are four (well really three) relatively simple steps, but they do require some explanation. Let’s start with #1. The idea here is that you use the GP editor on a domain-based GPO to set the GP preferences settings you’re interested in eventually applying to a local GPO. As an example, I ‘ve created a GPO in my domain that creates a shortcut to Notepad on the desktop, as shown here:
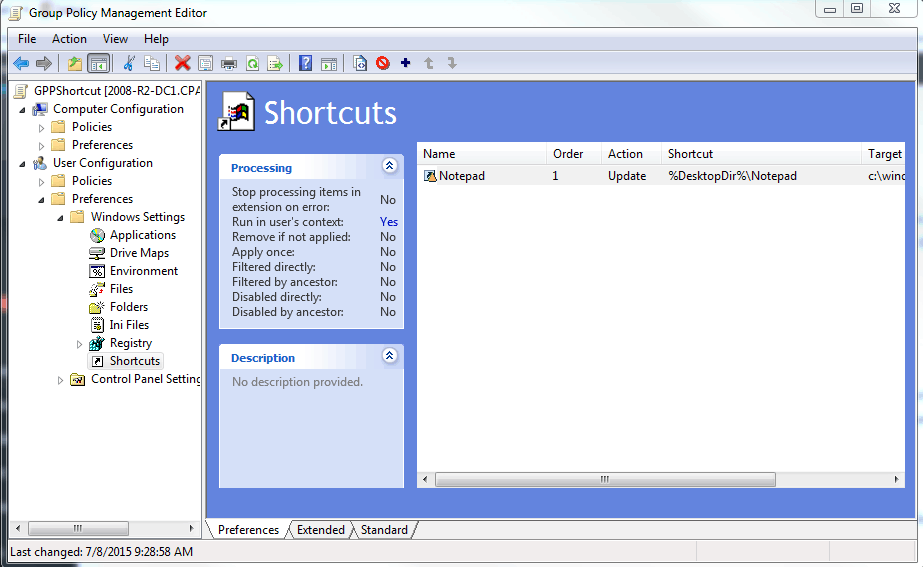
Creating GP Preferences Settings in domain-based GPO
Once the settings are created, we need to copy the underlying settings file structure from the SYSVOL portion of this GPO into the local GPO, as described in Step 2 above. Let’s see how that works. First you need to find the GUID of the GPO, which can be found in GPMC by going to the Details tab when the GPO is highlighted. The GUID is the number described as “Unique ID”. Once you have that, you can navigate to the SYSVOL portion of that GPO. In my test domain, which is called cpandl.com, the SYSVOL portion of the GPO I created above is here:
\\cpandl.com\sysvol\cpandl.com\policies\{B956F870-72B3-42D2-9752-3A6374BEF7D7}
Because the shortcut preference setting I created is a per-user setting, I’m going to find it under:
\\cpandl.com\sysvol\cpandl.com\policies\{B956F870-72B3-42D2-9752-3A6374BEF7D7}\user
Further, GP Preferences settings are stored under a folder called “Preferences”. So, in my example GPO, if I open up the Preferences folder, I’ll see the Shortcuts folder. And, within there, I’ll see the actual XML file that contains the shortcut settings. So what I want to do is, starting at the Preferences folder, copy and paste the contents of Preferences under the local GPO in c:\windows\system32\grouppolicy\user.
Once that’s done, the local GPO’s file system will look like the following:
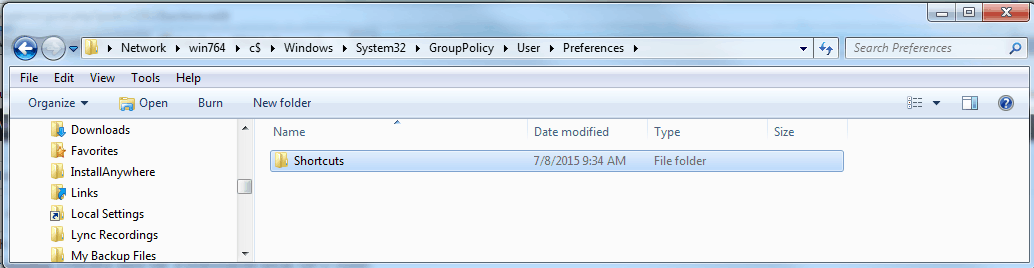
GP Preferences settings copied to the local GPO
The next step, which is probably the most complicated, is the one where we need to update the gpt.ini in the local GPO to tell it about the GP Preferences setting that has been copied into it. The gpt.ini file contains to sections two keys that we care about, depending upon whether the GP Preferences copied were per-computer or per-user. The following screenshot shows an example of the gpt.ini for a local GPO:

Viewing the gpt.ini on the local GPO
You’ll see two keys in that file–gPCMachineExtensionNames and gPCUserExtensionNames. These two keys inform the local GPO which policy areas have been implemented, and are required for proper processing of our newly copied GP Preferences settings. That said, the updating of this file requires a bit of explanation.
On domain-based GPOs, these two keys are actually stored in the groupPolicyContainer (GPC) portion of the GPO in AD, as attributes on the AD object. But in the local GPO, because there is no AD involved, they are represented in gpt.ini, and must be populated. The format for these is a bit convoluted, but is roughly as follows. Each GUID pair that you see delimited by square brackets [] is the Client Side Extension (CSE) GUID of the policy area being implemented, followed by the MMC snap-in GUID of that same policy area. So in the case of GP Preferences shortcuts, that GUID pair is:
{C418DD9D-0D14-4EFB-8FBF-CFE535C8FAC7}{CEFFA6E2-E3BD-421B-852C-6F6A79A59BC1}
Usually that is enough to know for most policy areas. However, GP Preferences is a bit “special”. It also stores the MMC snap-in GUID separately at the front of the list. If you look at this attribute on any GPO that has GP Preferences implemented, you’ll find a GUID that looks like this: {00000000-0000-0000-0000-000000000000}, followed by the MMC snap-in GUIDs of any GP Preferences areas implemented in the GPO. Those are all surrounded by a single set of square brackets. So, if we want to add per-user GP Preferences shortcut settings to our gpt.ini file, the resulting gPCUserExtensionNames key value is going to look like this:
gPCUserExtensionNames=[{00000000-0000-0000-0000-000000000000}{CEFFA6E2-E3BD-421B-852C-6F6A79A59BC1}][{C418DD9D-0D14-4EFB-8FBF-CFE535C8FAC7}{CEFFA6E2-E3BD-421B-852C-6F6A79A59BC1}]
where the first set of square brackets is that special “zero GUID” followed by the MMC snap-in GUIDs of any GP Preferences configured in the GPO, then each subsequent policy area GUID pairs in their own square brackets.
This example above assumes no other policy areas have been implemented in that local GPO. If they have, then each square bracket delimited CSE/MMC GUID pair must be sorted alphanumerically in the list for this all to work. If those other policy areas are GP Preferences, then the MMC snap-in GUID for each one must be included in the square brackets section at the beginning, after the {00000000-0000-0000-0000-000000000000} GUID. Obviously, Microsoft did not mean for this to be manually hacked, but nonetheless, it is possible!
So, once the files are copied and the gpt.ini is updated, a simple gpupdate command should let the GP Preferences settings take effect on the local GPO!
I hope you find this tip useful and let me know if you have questions on implementing it!
Darren
Hello Darren,
Great article, will help a lot. Could you please explain how to find the CSE/MMC GUID for other preferences (IE Setting, Folder, etc…) ?
Thanks in advance !
Regards,
Antoine D
Found it ! Simply use a LDAP query in PowerShell (where the GUID is the GPO one) :
$Object = [adsi]’LDAP://cn={b13e3fa8-6ca2-47fb-8a99-7d8445b1d44b},cn=policies,cn=system,DC=domain,DC=com’
$Object.gPCUserExtensionNames
Glad you found it Antoine–sorry I missed this originally!
Darren
thankyou, I was not expecting this would work before I read and try that ;D
and thankyou for the LDAP query
I just found your article on Group Policy Preferences in the Local GPO while researching an issue where the local gpt.ini is breaking application of domain computer group policy on machines that were upgraded from Windows 7 to Windows 10 and have GUID sections of greater than 65536 characters. Premier support is at a loss. The work around has been to erase gpt.ini or remove arbitrary GUID pairs until the character count is less than 65,536, then do a gpupdate.
Recommendations of where to post such a specialized issue?